Equipment
Hand Tools
This will give you an idea of the sort of equipment you will need access to in order to undertake a project like this one. One of the things that I am trying to show with this project, is that with modest means, and pretty basic equipment, you can build a trike of your own.
First of all, for welding it is a good idea to have a metal bench to work on. Then you can simply earth the bench, clamp your work to it, and start welding. I made mine out of a sheet of ¼" plate and some heavy angle for the sides and legs. But you could simply place a sheet of plate on some steel saw horses.
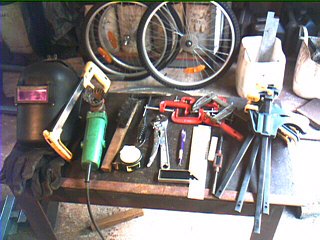
Starting from the left, the things I have laid out here are include:
- Long leather welding gloves, leather apron, and a helmet. I also have a separate set of gloves I use for the angle grinder, because you want to keep your welding gloves free of holes so you don't get burnt. The helmet has an automatically darkening lens on it. These have become much more affordable recently and are a must.
- A hacksaw. I use a metal chop saw (below) for all the simple cuts, but for acute angles a hacksaw is the best option.
- An angle grinder with a heavy wire brush for metal preparation. If you can afford to, get a few cheap angle grinders and have one for each job: heavy wire brushing, heavy grinding, and the cut-off saw.
- Standard wire brush and slag pick for chipping slag and scale off your welds.
- A tape measure
- A set of vice grips. In my case I use a Stanley adjustable spanner that has a vice grip mechanism in the handle. This is great tool for holding groups of small pieces together against the grinding wheel so they all end up the same -- without getting your fingers burnt.
- A metal set square and ruler.
- A lead pencil and some steel marking chalk.
- A tap set with M6, M8 and M10 taps.
- A set of clamps of various shapes and sizes.
Drill Press
As far as power tools go, a drill press and an X/Y vice is really handy. You will also need a set HSS drill bits and various hole saws. I have found that a bottle WD40/CRC/RP7 to be the best cutting compound for light work like this. You just keep squirting a few drops on your job as you cut or drill it and the bit will cut through it with very little effort.
On the left side of this photo you will notice I have various blocks of wood and and short lengths of metal. For any drill press with an X/Y vice I would recommend you purchase:
- 2 x 5mm x 40mm x 100mm lengths of angle iron,
- 4 x 10mm x 100mm lengths of flat iron,
- 2 x 14mm x 14mm x 100mm lengths of square bar,
- 2 x 25mm x 25mm x 100mm lengths of square bar,
- various short lengths (10mm - 20mm) of heavy 50mm x 50mm RHS and 50mm x 100mm RHS.
These should be cut so they are perfectly square. If you have a set like this you can clamp, position and space all sorts of things, much easier than you can with a vice alone, and if you make a mistake, you only drill into them and not your precious X/Y vice! I actualy got a most of my bits and pieces from the scrap offcuts bin at a local engineering firm.
Chop Saw
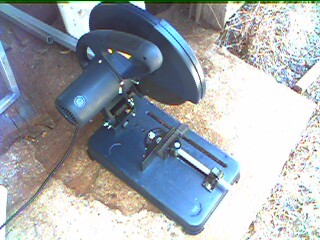
Even though you can cut everything you need out by hand using a hacksaw, the price of metal chop saws has come way down. I use a 2400 watt 14" metal clop saw with a quick release vice that you can adjust ±45°. The only thing you need to be mindful of is that the saw is rather heavy and base does flex a bit, so unless you place the saw on a perfectly flat surface, the saw blade may not be square to the base when you go to cut your metal. Check is with your square before you start, if its not chock it if need be, until the blade is square with the base.
Bench Grinder
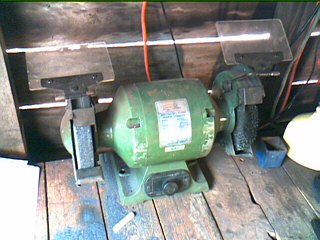
The other thing to have is a bench grinder. I have a grinding wheel on one end and a wire brush on the other. Always use a back and forth motion when you are grinding to prevent ruts from forming in the wheel.
Welder
Finally you will need a welder, but this is your choice. I use a small stick welder, mostly because its portable, runs off power from a standard wall socket or generator, and can be used outside in windy conditions. When I use it in our shed, I have the doors and roller door open and a big floor fan running to blow the fumes away. The airtight canisters in the photo above are for holding the electodes and keeping them dry, which is particularly important in humid areas.
The good thing about stick welders is you can quickly switch between 1.6, 2.0, 2.4 and 3.2mm electrodes simply by dialing up a different amperage setting. You can also use high tensile electrodes for hard facing and stainless electrodes for welding stainless steel. With 1.6 electrodes I have even been able to weld 1.2mm tubing with a bit of practice and patience.
All that being said, the big downside of stick welding is that its probably harder to master, and its very messy. If you are planning to build a bike in your garage, and its reasonably free of drafts, you might consider a MIG welder. These are the hot glue guns of welding, and all things considered, pretty easy to use, once you get them set up right. If you want to weld thin wall tubing > 1.6mm or aluminum, then a TIG welder is the best choice, but more expensive. Another option is brazing, it is relatively affordable, and with good preparation can produce excellent results.
Copyright © 2007 Henry Thomas
![]()


